


The Mission Planner allows you to fine tune six mission parameters including the waypoint route, the aircraft in the mission and the weapons. Remember, if at any stage you wish to back out from editting your mission, select Auto in the main Mission Planner screen to let the computer complete that stage for you.
The first thing we need to check is where the enemy radar coverage is by overlaying the EWR, SAM and airbase radars. This will give you a very good feel of how well defended the target is. If the target has EWR coverage then it is very likely that enemy CAPs will be vectored by an enemy AWACS to intercept you.

If the target has SAM coverage, then you will need either Air to Ground weapons, or a Wild Weasel flight. Another alternative would be to go with maximum stealth and hope you can get in and out before the SAMs lock you up. The last thing to look for is the enemies airbase coverage. If the target is inside a red zone, then you will be in range of scramble aircraft - expect air resistance.

In our example the target is covered by all three types of threat - this is going to be a rough ride. Because the target is just over the border we still have a reasonable chance of success. We'll need a lot of air support - the mission is near the very heart of the enemies cluster of frontline bases. Don't forget that not only will you have problems with scrambled fighters and CAPs, regular strike missions with escort flights that are leaving bases in this area are very likely to engage you.

SEAD mission are very important as these help bring down the enemies comms network. The actual sites however normally consist of very few targets.
Before setting our flights, it's a good idea to have a quick look at the target area in detail. Here we can see that there are only two targets - This is good news as we'll only need a single strike flight to flatten this target. Zooming out will also show you other local sites - keep an eye out for military targets, these will be heavily defended by SAMs. Take particular note of any close by enemy airbases.
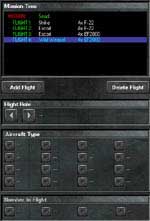
Taking on board the above information we are now in a position to set up our flights. The first flight is the F-22 strike flight - that's us.
As we only need one strike flight and bearing in mind the amount of resistance we're going to encounter, it would be a good idea to add a couple of escort flights. Grab the best planes you can get you hands on. F-22s and EF2000 can carry a lot of ordinance, these will sort out the enemy interceptors. We'll also add a wild weasel to take care of the local SAM and AAA defenses.
Early on in the campaign planes are readily available - take advantage of this while you can. This is not like the Gulf War, you can guarantee after a few days of fighting your mission quota will be down from 16 aircraft to maybe only 8 or 4. If the war is going badly you maybe on your own.
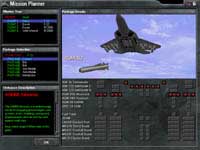
On this mission the stealthily option is out. We're going to be flying right into a swarm of enemy activity, we need as much ordinance as possible.
Here we're loading a non-stealthy package of air to air weapons and air to ground Mavericks. The Maverick is multi-purpose, we can kill SAM and buildings. If our wild weasel flight gets taken out we will still stand a chance of getting through. The escorts, like us, are carrying all they can. No need for extra fuel either.

Setting a good waypoint route is critical to the success of a mission. Not only does it get you too and from the target avoiding threats, it can also be used to reference other sites.
For our mission there's going to be no avoiding the main threat so the important thing here is to look at our escape route. Overlaying SAM and AAA shows that to the south of the target is quite a large cluster of defenses.

If we now examine where the airbases are, we find that there is an active base to the south in about the same place. We'll plan our escape route back down to the south to over fly these areas. If we a being persuded by enemy aircraft they will run into a wall of SAM and AAA. If they don't take care of them scramble flights will be launched from the allied airbase.
We'll also be able to land, re-arm and re-fuel at these bases also. From there we can join in the fight or head home. If we're really lucky and the enemy doesn't chase us across the border we can simply skip a couple of waypoints and head directly home.

This is the attack pattern that you and your wingmen will follow. This is a stanadard Maverick attack pattern. This will be fine and we don't need to change it in any way. What is of concern here is the enemy airstrip to the north west. Using this information we can protect the strike flight by moving the escort CAP patrols to be inline with the enemy base. This setup will give us enough time to strike the target, turn and be gone before we get into any serious trouble.
So we've now finished the planning and it's time to jump into the cockpit and fly the mission.


